How convert a MS Access database into MS SQL Server format
In this article will be considered, how to use the “Import and Export Data” utility for converting database, that created by MS Access tools into Microsoft SQL Server database format.
This utility is supplied with Microsoft SQL Server 2008 system (in our case).
Contents
- Task
- Instructions
- 1. Running “Import and Export data” utility.
- 2. Selecting data source.
- 3. Selecting a destination.
- 4. Creating the MS SQL Server database.
- 5. Setting of parameters of data copy (converting).
- 6. Selecting tables and views from database, which is source
- 7. Run the package.
- 8. Final verification.
- 9. Copying (converting) data between databases
- 10. Conclusion.
- Related topics
Search other websites:
Task
Is given database file named “mydb.mdb“, that generated in MS Access. Convert the file into a Microsoft SQL Server format by using tools of Microsoft Visual Studio 2010. Full path to file is the following:
E:\1\mydb.mdb
⇑
Instructions
There are several methods database converting from MS Access format into MS SQL Server format.
The MS Visual Studio 2010 includes the “Import and Export data” utility (wizard utility). This wizard helps you to create simple packages of files, that import and export data between many popular data formats including databases, spreadsheets and text files. In our case the file with “*.mdb” extension will be converted into “*.mdf” format.
⇑
1. Running “Import and Export data” utility.
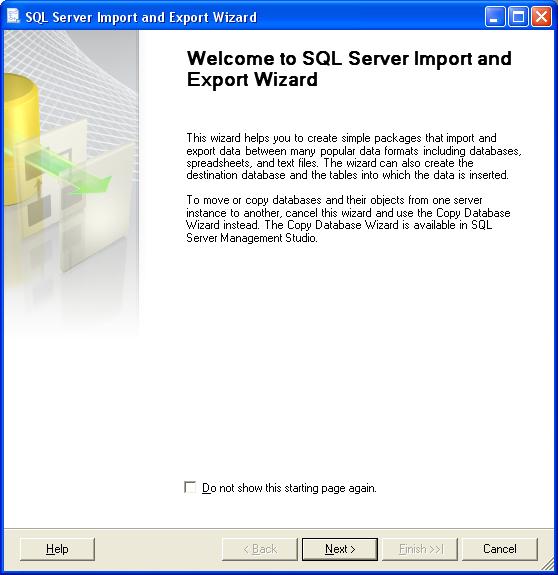
When we run utility the starting welcome window will be open (fig. 1). Click the “Next” button.
Fig. 1. “Import and Export data” wizard initial window
⇑
2. Selecting data source.
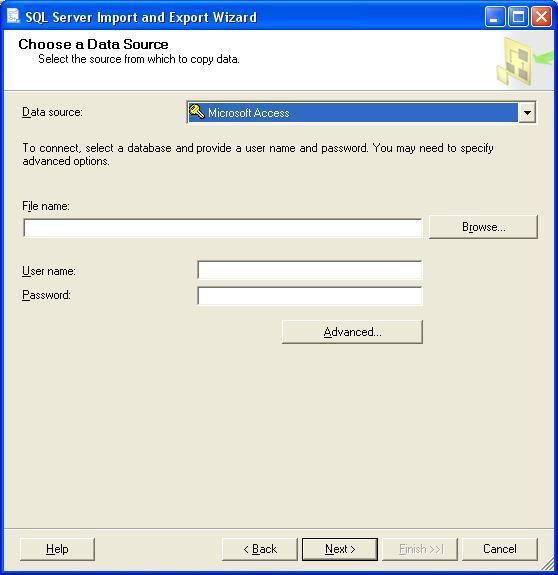
Our data base “mydb.mdb” is data source. The window of data source selecting is displayed on fig. 2.
In “Data Source” field we select “Microsoft Access“.
Рис. 2. Selecting the “Microsoft Access” data source
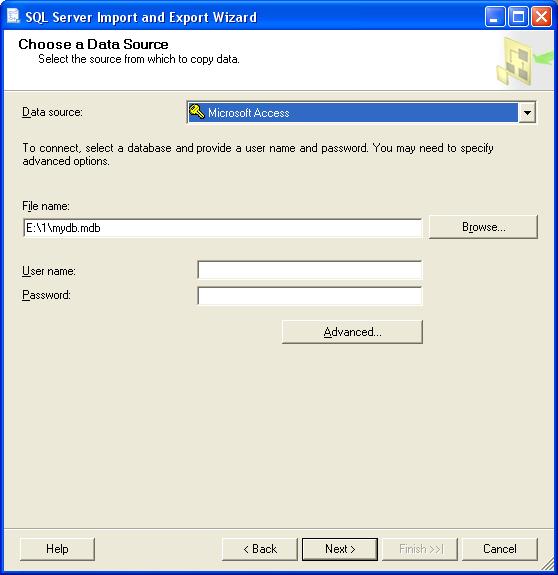
In field “FileName” we select our file on drive.
According to conditions of the problem our file is located in the following path “E:\1\mydb.mdb“. Click on the “Next” button.
Fig. 3. The window of data source selecting
If we need to do an additional settings, we need click on the “Advanced” button. This will open a child window, where you can set (change) the following main parameters:
- the path to data base file;
- login and password for access to database;
- access rights to the database;
- checking the connection to the database (* .mdb), and more.
⇑
3. Selecting the destination.
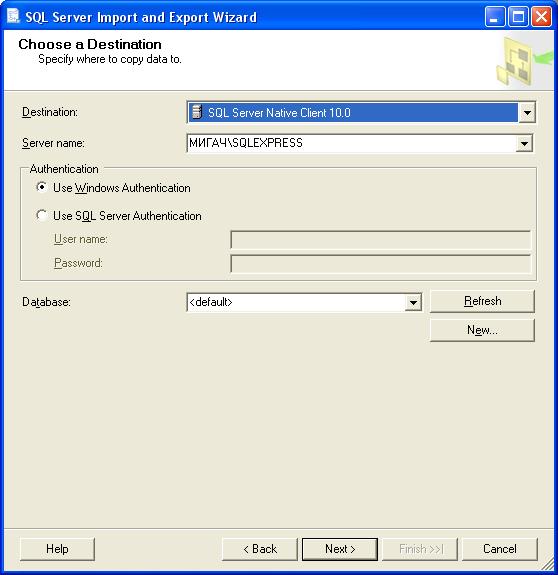
The window of selecting destination will displayed after (fig. 4).
Here we need to select a database, which will be copied (convert) the data from our database. According to problem condition, MS SQL Server is a destination.
In “Destination” field of drop-down list we select “SQL Server Native Client 10.0“.
Рис. 4. Selecting the destination
⇑
4. Creating the MS SQL Server database.
At this step we need to create MS SQL Server database, that also can be saved into some file (files).
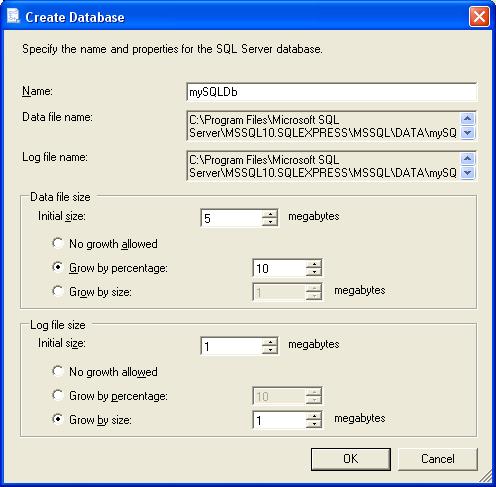
For this we click at “New…” button in “Database” field. Other fields we leave unchanged. As a result, the “Create Database” window will be opened.
In the “Name” field we input the name of database, that will be created. For example, “mySQLDb“. Automatically the system will generate full path to two files:
- to data file mySQLDb_Data.mdf;
- to registration file mySQLDb_Log.ldf.
Accordingly, in the system folders of Microsoft SQL Server, are created these two files:
C:\Program Files\Microsoft SQL Server\
  MSSQL10.SQLEXPRESS\MSSQL\DATA\mySQLDb_Data.mdf
C:\Program Files\Microsoft SQL Server\
  MSSQL10.SQLEXPRESS\MSSQL\DATA\mySQLDb_Log.ldf
Fig. 5. Window of creating of new MS SQL Server database
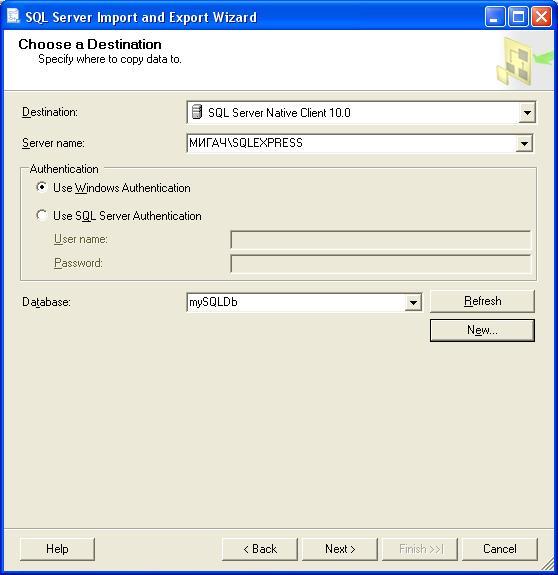
After clicking at “OK” button the select destination window will have view as shown in fig. 6. Click at the “Next” button.
Fig. 6. Selection window of destination with the created database mySQLDb
⇑
5. Setting of parameters of data copy (converting).
The next window opens, as shown in Fig. 7. Here, there is a choice of ways to copy data from one database table into another.
Fig. 7. The window of method selection of copying data between databases
As we see on Figure 7, there are two cases:
- “Copy data from one or more tables or views“;
- “Write a query to specify the data to transfer“.
In first case, all data are copied from selected tables of source database (MS Access).
In second case, only data, that is retrieved from SQL-query to database, are copied. On selecting this, the text of SQL-query is defined in the following steps of the wizard.
According to conditions of the problem, select the first option and click on the button “Next“.
⇑
6. Selecting tables and views from database, which is source
In this step, you need select the tables and views (if any) in the database, formed in the Microsoft Access (Fig. 8).
Fig. 8. Selection window of tables and views in database mydb.mdb
According to problem conditions, we select all tables from “mydb.mdb” database. As we see on Fig. 8, the “mydb.mdb” database includes 3 tables with names “Customer“, “Order“, “Tariff“.
Click on the “Next >” button.
⇑
7. Run the package.
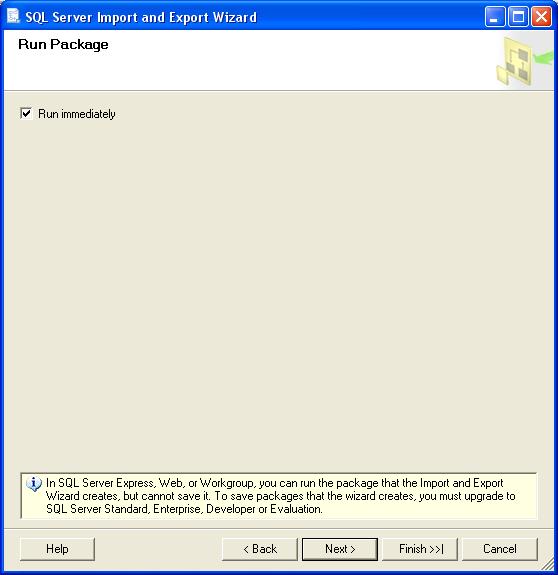
All settings for copying (conversion) are made. The next screen shows the preparation for the launch of the package configuration (Fig. 9).
We leave everything unchanged and click on the “Next>“.
Fig. 9. Fig. 9. The window of setting package running
⇑
8. Final verification.
If at the preceding steps everything was done correctly, then the window appears (Fig. 10) with approximately the following text:
Click Finish to perform the following actions:
Source Location : E:\1\mydb.mdb
Source Provider : Microsoft.Jet.OLEDB.4.0
Destination Location : МИГАЧ\SQLEXPRESS
Destination Provider : SQLNCLI10
- Copy rows from `Customer` to [dbo].[Customer]
  The new target table will be created.
- Copy rows from `Order` to [dbo].[Order]
  The new target table will be created.
- Copy rows from `Tariff` to [dbo].[Tariff]
  The new target table will be created.
- The package will not be saved.
- The package will be run immediately.
Provider mapping file :
C:\Program Files\Microsoft SQL Server\ 100\DTS\MappingFiles\JetToMSSql9.xml
As can be seen from the text is copied data of all three tables (Customer, Order and Tariff) database “mydb.mdb“. Also, additional information about the packet data, is stored in the system folder of MS SQL Server in XML format.
Fig. 10. Window of visual verification
⇑
9. Copying (converting) data between databases
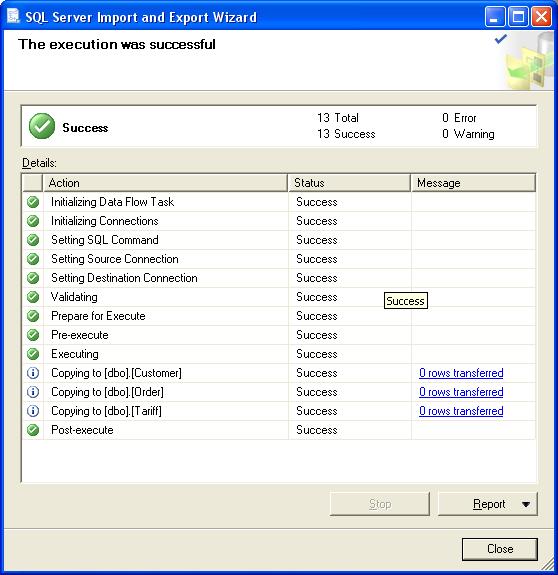
The next step is a converting data, the progress and the result of which is shown in the window in Figure 11.
Fig. 11. The window of converting result
⇑
10. Conclusion.
In this task the conversion of “mydb.mdb” Microsoft Access database into Microsoft SQL Server format was made.
MS Access database was placed on the disc in the following path:
E:\1\mydb.mdb
The resulting database is formed in the system folder of MS SQL Server and includes two files, which placed in the following way:
C:\Program Files\Microsoft SQL Server\
  MSSQL10.SQLEXPRESS\MSSQL\DATA\mySQLDb_Data.mdf
C:\Program Files\Microsoft SQL Server\
  MSSQL10.SQLEXPRESS\MSSQL\DATA\mySQLDb_Log.ldf
Now, we can use this database at programming of applications in MS Visual Studio 2010 and also we can use database in other systems of visual development of applications.
⇑
Related topics
- How to show MS Access database table in dataGridView
- Connecting to MS Access Database in Visual Studio 2010
- C# (term paper). Development of Automation Program of work of Manager
- An example of demo application which manipulates data in the table of database MS SQL Server (SQLEXPRESS)
