Development an application which forms SQL-queries to the database table
The process of creating application is described. This application is used for the study of SQL-queries to the database.
The task
The database “01_02_00_011_mydb.mdb” is given. This database contains three tables: Student, Marks, Group. The structure of tables is the following.
Table Students.

Table Group.
![]()
Table Marks.

Tables are connected between them by such scheme (Fig. 1):
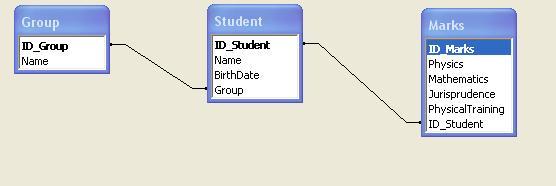 Fig. 1. The scheme of interconnections between tables
We need to develop the application, which will to form SQL-queries to database.
Progress
Save the project in any folder. It is recommended to copy the database file “01_02_00_011_mydb.mdb” into folder, where are placed working files of our project.
- Developing the form.
First, you need to increase the size of the form with the help of mouse.
You need to place on the form such components:
- from tab dbGo the component TADOConnection (Fig. 2);
- from tab dbGo the component TADOQuery (Fig. 2);
- from tab Standard components of type TButton and TMemo (Fig. 3);
- from tab “Data Controls” the component of type TDBGrid (Fig. 4);
- from tab “Data Access” the component of type TDataSource (Fig. 5).
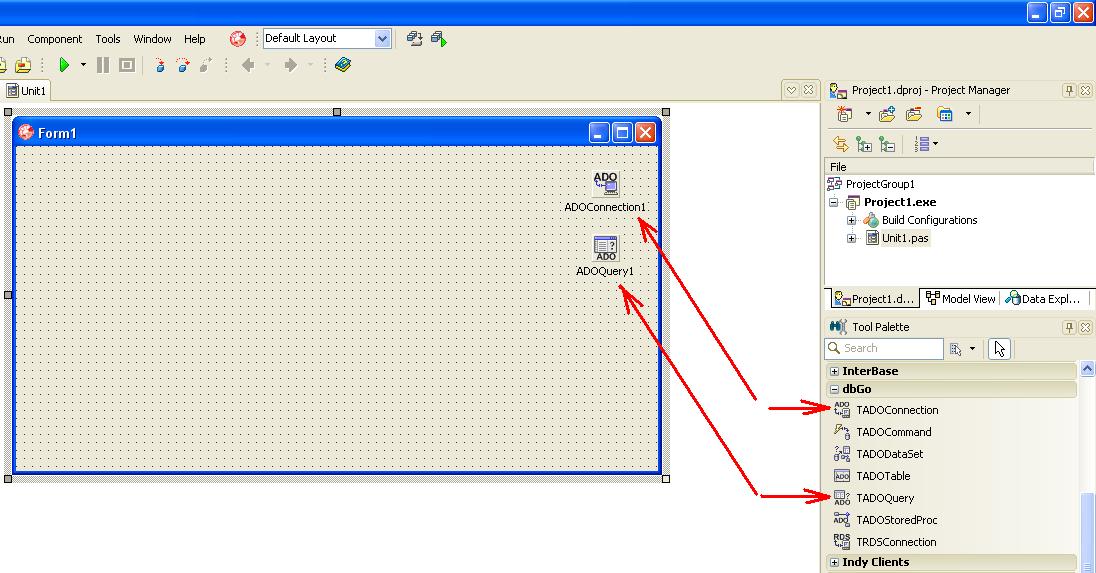 Fig. 2. Components TADOConnection and TADOQuery
 Fig. 3. Component of type TMemo at the form of application
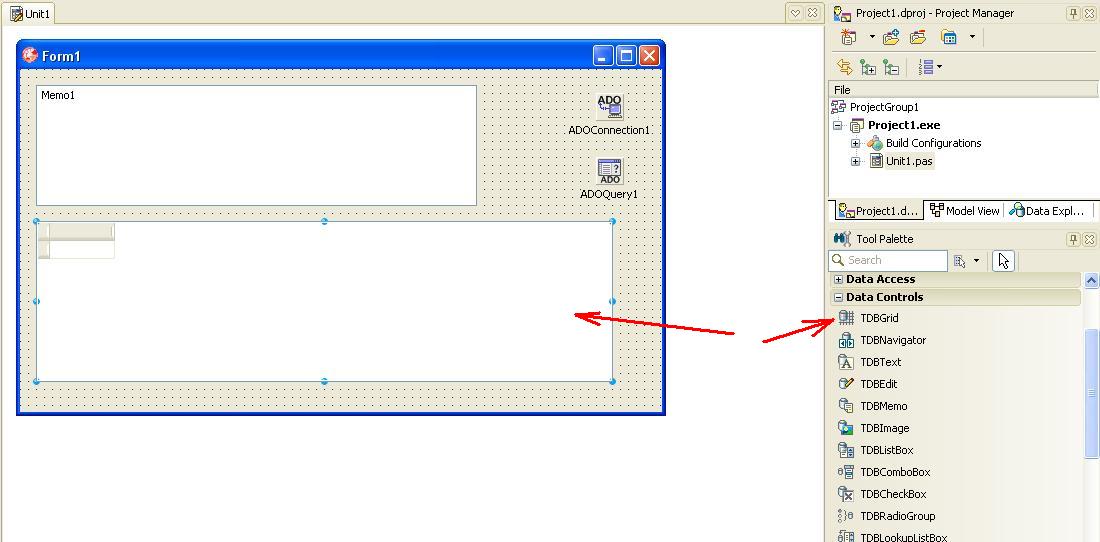 Fig. 4. Component of type TDBGrid
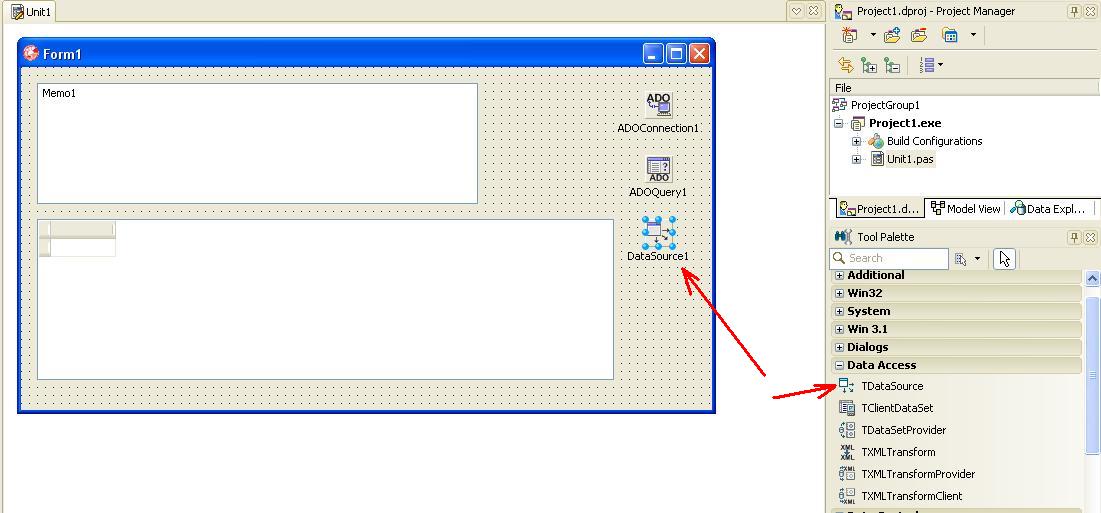 Fig. 5. Component of type TDataSource
As a result of executed actions, automatically will be created objects with the such names: ADOConnection1, ADOQuery1, Memo1, DBGrid1, DataSource1.
- Connecting database to the application.
To connect database to the application, you need to call the command “Edit ConnectionString” from context menu, that will be called by click of right mouse on the component ADOConnection1 (Fig. 6). The process of connecting to database includes several steps, is realized as wizard and described in detail here.
 Fig. 6. Calling the wizard of connecting to database
After connecting the database, you need set up the properties of other components, to get visualization of database.
- Setting up of properties of components.
With the help of Object Inspector we set such properties of components:
- in component ADOConnection1 property “LoginPrompt” set to value “false“;
- in component Button1 property Caption set to value “Execute query“;
- in component ADOQuery1 property Connection set to value ADOConnection1;
- in component DataSource1 property DataSet set to value ADOQuery1;
- in component DBGrid1 property DataSource set to value DataSource1.
After setting up of properties of components, the main form of application will have view as shown at Figure 7.
 Fig. 7. Main form of application after setting up components
Now, the database is connected to application. We can create the program code of form activation and the clicking at the button “Execute query“.
- Setting up of property SQL of component ADOQuery1.
To input text of SQL-query, first of all, you need open the code editor at the SQL-language of component ADOQuery1 (Fig. 8).
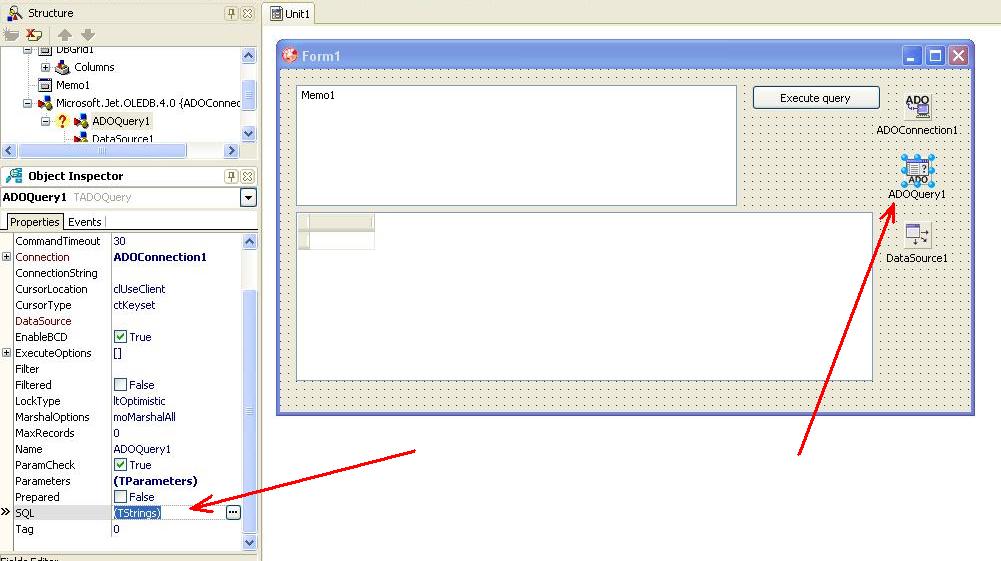
Fig. 8. Property SQL of component ADOQuery1
As a result, the code editor will be opened (Fig. 9). In this window you need to type the following text:
SELECT *
FROM Student
 Fig. 9. The window of code editor at the SQL-language
- Programming the event OnActivate of activation of main form.
We program the event of application form activation. This event is generated one of the earliest, therefore we need to write here the code, which initializes components. The detailed process of event programming in Delphi is described here.
We select the main form of application and call the event OnActivate from tab Events in Object Inspector (Fig. 8).
 Fig. 10. Calling of event OnActivate
Listing of event handle is the following.
procedure TForm1.FormActivate(Sender: TObject);
begin
  Memo1.Lines.Clear; // clear the text in Memo1
  Memo1.Lines.Assign(ADOQuery1.SQL); // assign the text of SQL-query from ADOQuery1 into Memo1
  ADOQuery1.Open; // Run SQL-query
end;
- The event programming OnClose of form closing.
The event OnClose of form is calling when form is closing. Therefore, you need to type the code of closing connection with database.
In the event of form closing type the following text.
procedure TForm1.FormClose(Sender: TObject; var Action: TCloseAction);
begin
  if ADOQuery1.Active then ADOQuery1.Close;
end;
This code checks the data set for the opening, and if this set open, it is closed by the method “Close” of component ADOQuery1.
- The programming of event OnClick of component Button1.
To give the command execute SQL-query into Memo1, we need to program the event OnClick of component Button1.
The code listing of event handle is following.
procedure TForm1.Button1Click(Sender: TObject);
begin
  if ADOQuery1.Active then ADOQuery1.Close; // the connection closed?
  ADOQuery1.SQL.Clear; // clear the text of previously SQL-query
  ADOQuery1.SQL.Assign(Memo1.Lines); // set the text of new SQL-query
  ADOQuery1.Open;   // executing query
end;
- Running the application.
After performing steps, you can run the application. The result of application running is shown at Figure 11. As we see from Figure 11, the all fields from table Student are displayed.
Text of SQL-query is formed in component Memo1, but result of it’s executing is displayed in component DBGrid1.
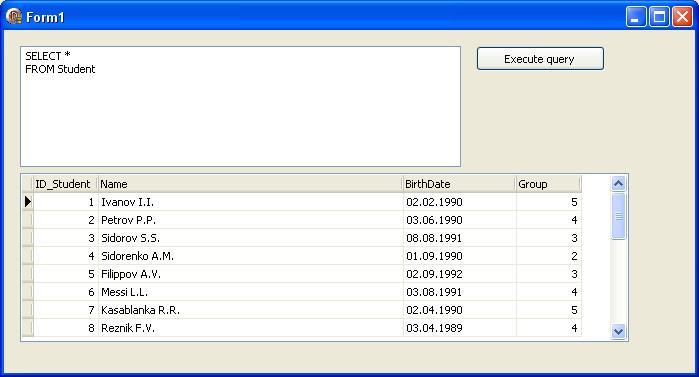 Fig. 11. The result of running the application
Let’s create other SQL-query, that shows of students, which have the mark 4 of mathematics.
SELECT *
FROM   Student, Marks
WHERE ([Student.ID_Student]=Marks.ID_Student) and
       (Marks.Mathematics = 4)
The result of running of application is shown at Figure 12.
 Fig. 12. The result of running the application