Creating an application of Windows Forms Application type in MS Visual Studio – C++. Review of main files of project
In the given topic is considered the features of creating the application of “Windows Forms Application” type that supports C++ language. This type of application supports all benefits the .NET Framework technology.
Progress
- Run Microsoft Visual Studio.
As a result, the window with active tab “Start Page” will be opened (Figure 1).
 Figure 1. The window “Start Page“
- Creating the application of Windows Forms Application type.
To create a new project (solution) in C++ language, you need to select the consequently of commands (Figure 2):
File -> New Project...
Microsoft Visual Studio proposes different types of application templates for programming in C++ (Figure 2).
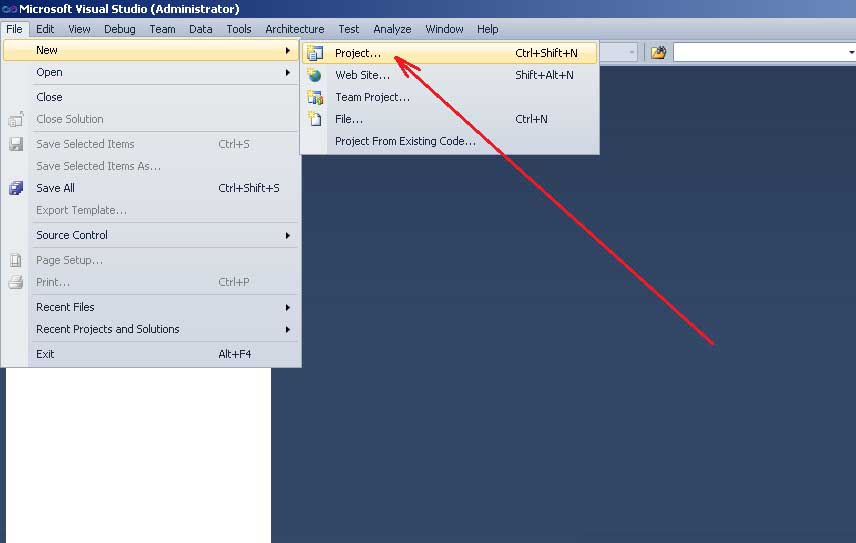 Figure 2. Calling the command of creating a new project
As a result, the window “New Project” will be opened (Figure 3). In this window you need to select the template “Visual C++” and application type “Windows Forms Application“.
In the “Location:” field you need to set the path to the folder, in which project will be saved. In our case you need to set the following path
C:\Programs\CPP
In the field “Name” is set the name of application. In our case this is “MyApp01“.
If the option “Create directory for solution” is enabled, then project will be saved in the folder
C:\Programs\CPP\MyApp01
In the field “Solution name:” is set the name of solution. The solution can combine several projects. In our case the name of solution is the same as name of project.
 Figure 3. The window “New Project” of creating a new project
- Main components of windows interface for working with program.
After selecting “OK” in the previous window “New Project“, MS Visual Studio will create the all needed code for working the application of “Windows Forms Application” type.
As a result, the window will look like as shown in Figure 4.
In the center of window the main form of application is displayed. You need to place on the form different components. The components are placed on the panel “Toolbox” (the left side of the screen).
The form or component properties are displayed in the utility Solution Explorer (the right side of screen). By changing these properties, you can affect the view of form, behavior of form, realize the event handlers of form and so on.
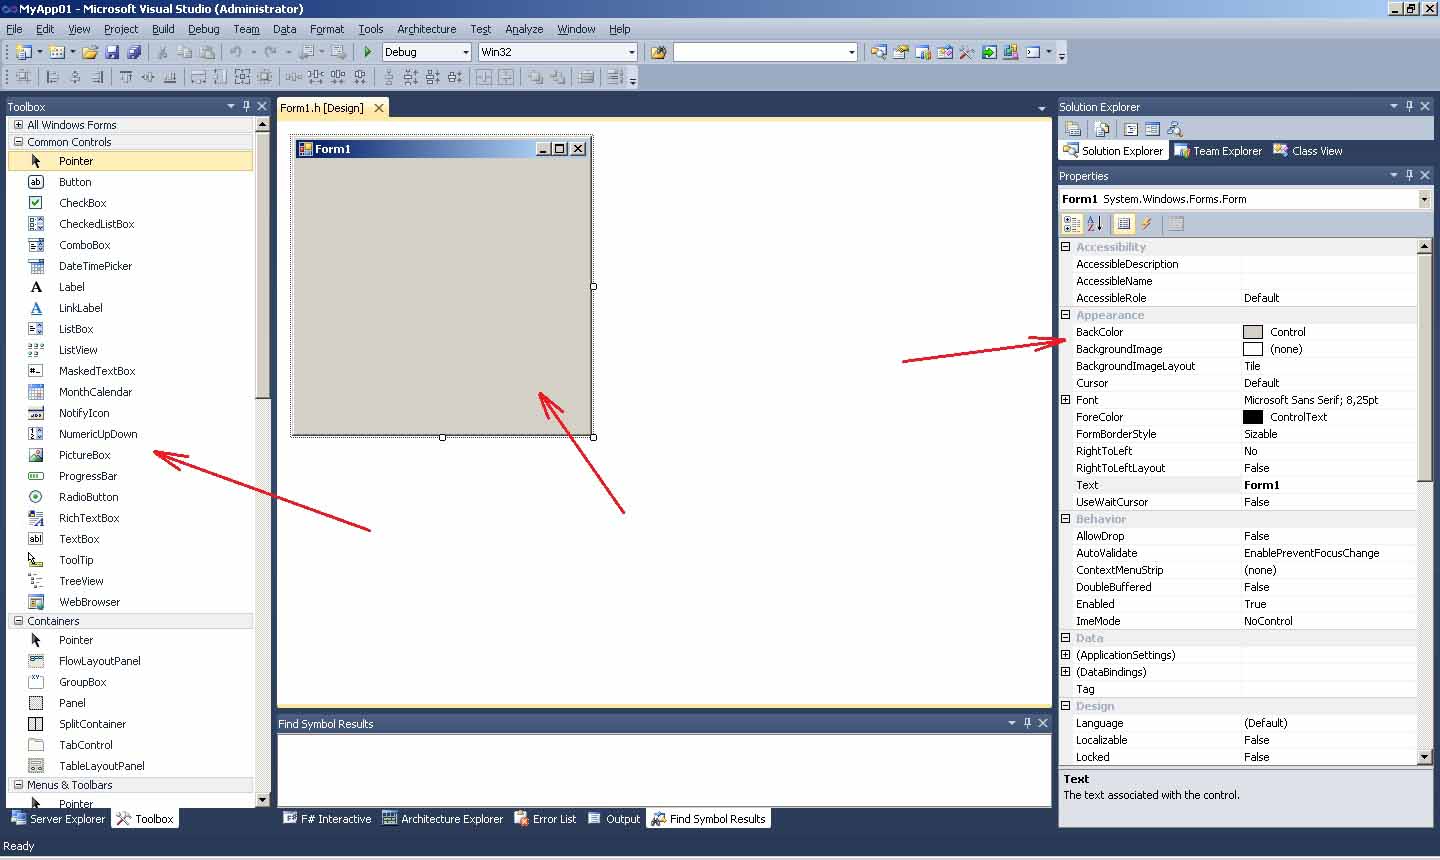 Figure 4. The main elements of application window
- Calling the mode of entering code.
At the moment the design mode is active. To go to the mode of typing the program text , you need to call the command Code from menu View (Figure 5).
View -> Code
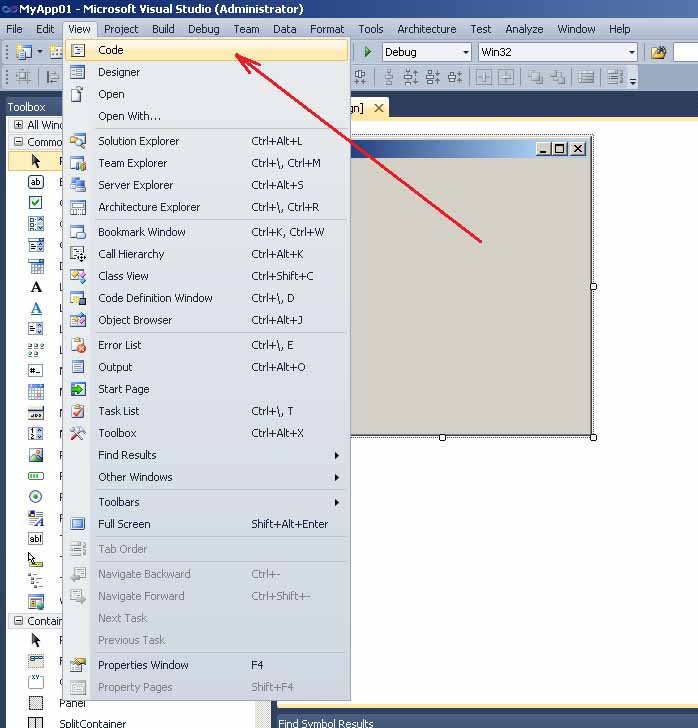 Figure 5. The command to go to the mode of typing the program text
Another way to call the command to go to the mode of typing the program text, is to click on the corresponding button in Solution Explorer (Figure 6).
 Figure 6. The button to go to the mode of typing the program text
As a result, the program text will be shown.
 Figure 7. Mode of viewing the program text
- Text of file “Form1.h“.
When you creates a project, Microsoft Visual Studio generates a program code, which is saved in different files.
The main file is named “Form1.h“. In this file programmer develops own program code.
This file corresponds to the main form of application. On the main form different components are located. By using these components you can realize the solution of specific task. When project is created – the empty form is created too (Figure 6). Besides the main form, you can create other forms and add them to the project.
Listing of file “Form1.h” is shown below.
#pragma once

namespace MyApp01 {

       using namespace System;
       using namespace System::ComponentModel;
       using namespace System::Collections;
       using namespace System::Windows::Forms;
       using namespace System::Data;
       using namespace System::Drawing;

       /// <summary>
       /// Summary for Form1
       /// </summary>

       public ref class Form1 : public System::Windows::Forms::Form
       {
       public:
              Form1(void)
              {
                    InitializeComponent();
                    //
                    //TODO: Add the constructor code here
                    //
              }

       protected:
              /// <summary>
              /// Clean up any resources being used.
              /// </summary>

              ~Form1()
              {
                    if (components)
                    {
                           delete components;
                    }
              }

       private:
              /// <summary>
              /// Required designer variable.
              /// </summary>

              System::ComponentModel::Container ^components;

#pragma region Windows Form Designer generated code
              /// <summary>
              /// Required method for Designer support - do not modify
              /// the contents of this method with the code editor.
              /// </summary>

              void InitializeComponent(void)
              {
                    this->components = gcnew System::ComponentModel::Container();
                    this->Size = System::Drawing::Size(300,300);
                    this->Text = L"Form1";
                    this->Padding = System::Windows::Forms::Padding(0);
                    this->AutoScaleMode = System::Windows::Forms::AutoScaleMode::Font;
              }
#pragma endregion
       };
}
Let’s explain some code snippets in the program.
In the listing above, the namespace MyApp01 is created by using operator
namespace MyApp01 {
...
}
In this namespace, other namespaces are included from the .NET Framework library:
System
System::ComponentModel
System::Collections
System::Windows::Forms
System::Data
System::Drawing
The class named Form1 is created in the namespace MyApp01. This class corresponds to the main form Form1 of application.
Class contains a constructor that calls the method
InitializeComponent();
In the InitializeComponent() method the component-form is created (variable “components”), which is a container. It means that different components can be placed on the form (buttons, labels, text boxes and others). Also, the form parameters are set in method InitializeComponent(): form title, form size (300*300 pixels), default font.
Destructor of class ~Form1() destroys the form (variable components) by using delete operator.
- Files, which are created in project.
After creating a project of “Windows Forms Application” type, Microsoft Visual Studio creates several files.
 Figure 8. C++ files, which are created in project
As mentioned earlier, the main file is “Form1.h” (see paragraph 5). Also, according to the rules of the C++ language, an implementation file “App01.cpp” is created. Main function main() is realized in this file. This file contains a code to display the main form.
Listing of “MyApp01.cpp” file is following:
// MyApp01.cpp : main project file.
#include "stdafx.h"
#include "Form1.h"

using namespace MyApp01;

[STAThreadAttribute]

int main(array<System::String ^> ^args)
{
     // Enabling Windows XP visual effects before any controls are created
     Application::EnableVisualStyles();
    Application::SetCompatibleTextRenderingDefault(false);

     // Create the main window and run it
     Application::Run(gcnew Form1());
     return 0;
}
File “MyApp01.vcxproj“. This is the main project file for VC++ projects generated using an Application Wizard. It contains information about the version of Visual C++ that generated the file, and information about the platforms, configurations, and project features selected with the Application Wizard.
File “MyApp01.vcxproj.filters“. This is the filters file for VC++ projects generated using an Application Wizard. It contains information about the association between the files in your project and the filters. This association is used in the IDE to show grouping of files with similar extensions under a specific node (for e.g. “.cpp” files are associated with the “Source Files” filter).
File “AssemblyInfo.cpp“. Contains custom attributes for modifying assembly metadata.
Files “StdAfx.h” и “StdAfx.cpp“. These files are used to build a precompiled header (PCH) file named “MyApp01.pch” and a precompiled types file named “StdAfx.obj”.
- Run the project.
To run project, the command “Start Debugging” from menu “Debug” is used (F5 key).