An example of creating a distributed application that demonstrates remote interaction between computers on a network. Namespace System.Runtime.Remoting. Http-protocol
This topic describes one of the ways to develop a simple distributed application that uses remote interaction between computers on a network. By using this example, you can learn to develop applications that interact with each other in a local network. This topic requires basic skills in Microsoft Visual Studio 2010.
Contents
- Task
- Considerations
- Instructions
- 1. Run Microsoft Visual Studio 2010
- 2. Development of a common assembly with metadata
- 3. Creation of a program code which will be placed on a server computer
- 4. Client application development
- 4.1. Creating a client-side application using Windows Forms template
- 4.2. Designing the form
- 4.3. Module Form1.cs text
- 4.4. Algorithm of the client program
- 4.5. Writing client code
- 5. Testing the interaction between the client and the server on the same computer without using a local network
- 6. Copying the server part to another computer
- 7. Determining the name of the server on the network from the client computer
- 8. Correction of client code. Replacing the name localhost
- 9. Testing the interaction between the client and the server on different computers that are interconnected in a local network
- Related topics
Search other websites:
Task
1. Develop a distributed application that contains the following parts:
- server part. The server must contain functions for solving mathematical tasks. In this case, as an example, the server contains a method that solves a quadratic equation. The part on the server side should be developed as a console application;
- client part. The client contains program code that gets the result from the server side. The client calls the quadratic equation function, which is implemented and executed on the server. The client part should be developed as an application of Windows Forms type.
2. The interaction between the client and the server is organized on the basis of the Http protocol.
3. The application is implemented in Microsoft Visual Studio 2010 using the C# .NET programming language.
4. To organize the interaction between computers use the tools from the System.Runtime.Remoting namespace.
⇑
Considerations
To verify the correctness of the task, you must have at least two computers that are interconnected in a local network.
Development of a distributed application is carried out on a single computer in MS Visual Studio 2010. Testing the interaction of the client and server parts are also carried out on the same computer.
After testing is complete, the server code is placed on the server computer. The client code from the client computer makes a request to the server computer, receives the response and displays this response on the screen. In our case, the client code calls the server function to solve the quadratic equation.
⇑
Instructions
1. Run Microsoft Visual Studio 2010
⇑
2. Development of a common assembly with metadata
2.1. What is a common assembly?
In order for the client and server to interact with each other, it is necessary to have another part of the program code – a common assembly. The common assembly contains type metadata that are valid for a remote call. Type metadata is information about the data types used in a remote call. This information is needed both by the client and the server.
Ultimately, after creation, the program code of the overall assembly should be placed both on the client’s computer and on the server’s computer. Otherwise, the connection between the client and the server cannot be established.
⇑
2.2. Creating a module of general assembly
In our case, the general assembly is not an executable file. This is a library that is saved in *.dll format.
In Microsoft Visual Studio 2010, the Class Library template is used to create the library. In this example, to create a general assembly module, run the command
File -> New -> Project...
The “New Project” window opens, in which you need to select Visual C # -> Class Library. In our case, the folder for the library: “D:\Programs”. Library name ClassLibrary1 (default). Optionally, you can change the folder and library name.
Figure 1. Creating a library using the Class Library template
After selecting OK, a project is created that contains one Class1.cs file. The file code is as follows:
using System;
using System.Collections.Generic;
using System.Linq;
using System.Text;

namespace ClassLibrary1
{
    public class Class1
    {
    }
}
By default, a class is created with the name Class1 in the ClassLibrary1 namespace. In our case, leave everything as is. Optionally, you can change the name of the class and namespace.
⇑
2.3. Text of module of common assembly
In the module Class1.cs you need to enter the necessary program code. This code will be executed on the server side. And the client will call this code.
In accordance with the condition of the problem, the server must solve math tasks. Therefore, in the class Class1 you need to enter the function of solving a quadratic equation. In our case, the function is called CalcEquation().Optionally, here you can enter other functions that solve different tasks.
The class Class1 also inherits the data and methods of the MarshalByRefObject class. The MarshalByRefObject class provides access to objects within an application domain in applications that support remote access. This is a specially designed class to support distributed access to applications.
In the MarshalRefObject class there is a CreateObjRef() method that will be used in our project. The CreateObjRef() method contains all the necessary information to generate a proxy. A proxy is used to connect to a remote object.
The listing of the general assembly module is as follows (Class1.cs file):
using System;
using System.Collections.Generic;
using System.Linq;
using System.Text;

namespace ClassLibrary1
{
    // Class1 inherits MarshalByRefObject class
    public class Class1 : MarshalByRefObject
    {
        // calculation function of the quadratic equation
        public bool CalcEquation(double a, double b, double c, out double x1, out double x2)
        {
            double d; // discriminant

            // Quadratic equation solution
            // calculation of discriminant
            d = b * b - 4 * a * c;

            if (d > 0)
            {
                x1 = (-b - Math.Sqrt(d)) / (2 * a);
                x2 = (-b + Math.Sqrt(d)) / (2 * a);
                return true;
            }
            else
            if (d == 0)
            {
                x1 = x2 = (-b) / (2 * a);
                return true;
            }
            else
            {
                x1 = x2 = 0;
                return false;
            }
        }
    }
}
⇑
2.4. Explanation to the method of solving the quadratic equation
The method of solving the quadratic equation CalcEquation() gets the input parameters of the coefficients a, b, c. If the equation has a solution, then the method returns true and the value of the roots of the equation in the variable parameters x1, x2. If the equation has no solution, then the method returns false and zero values of the variable parameters x1, x2.
⇑
2.5. Compilation. Creation of .dll file of the common assembly
At this step, you need to compile the project using the command
Build -> Build Solution
As a result, a common assembly *.dll file will be created with the name ClassLibrary1.dll, which is located in the following folder
D:\Programs\ClassLibrary1\ClassLibrary1\bin\Debug\
This file will need to be placed in folders with executable modules on the client computer and on the server computer. Common assembly file is done.
Figure 2. The ClassLibrary1.dll file
⇑
2.6. Close solution (project)
Common assembly is developed. To close the Solution you need to run the command
File->Close Solution
At the next stage, the program code of the server part of the distributed application will be developed.
⇑
3. Creation of a program code which will be placed on a server computer
After creating the file (module) of the common assembly on the same computer, you need to develop a program code that will be placed on the server computer.
For the server to respond to client requests, the server-side software code must be run at the time of the request.
⇑
3.1. Creating an application of Console Application type
In accordance with the condition of the problem, on the server side you need to create an application of the Console Application type. This is done in the standard way using the command
File -> New -> Project...
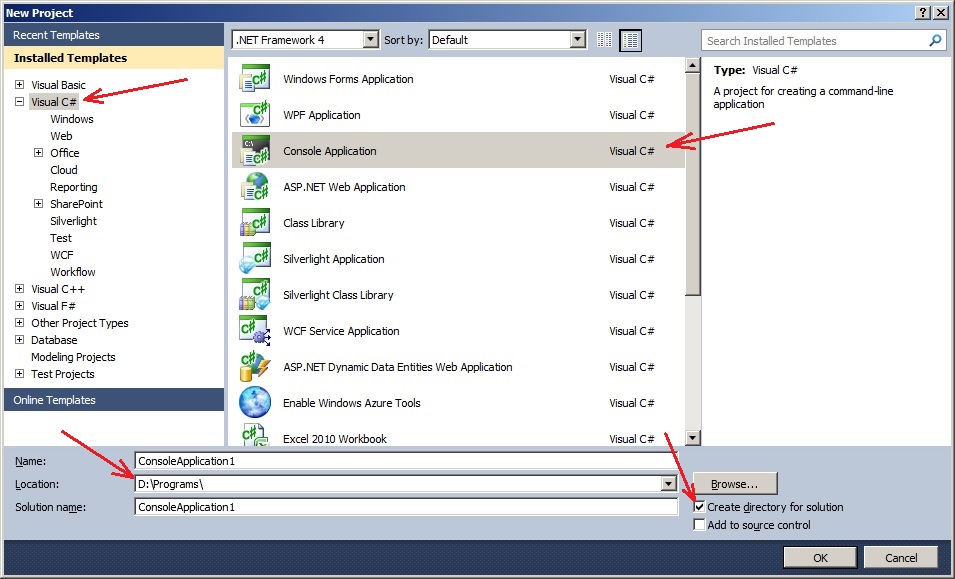
As a result, the New Project window will open (Figure 3), in which you need to:
- select the template Visual C# -> Console Application;
- leave the project name as ConsoleApplication1 by default. Optionally, you can change this name;
- select a folder for the project D:\Programs (or another folder);
- set the option “Create directory for solution”.
Figure 3. Window for creating a console application
As a result, a regular console application will be created that contains the Program.cs file. This file declares the ConsoleApplication1 namespace, which implements the Program class.
The code of file is as follows
using System;
using System.Collections.Generic;
using System.Linq;
using System.Text;

namespace ConsoleApplication1
{
    class Program
    {
        static void Main(string[] args)
        {
        }
    }
}
⇑
3.2. Adding links to assemblies
To use the general assembly program code you need to connect:
- assembly System.Runtime.Remoting. This assembly contains all the necessary tools for remote access;
- common assembly ClassLibrary1, which was developed in p.2. This assembly contains a method for solving a quadratic equation.
⇑
3.2.1. Adding a reference to the System.Runtime.Remoting assembly
To add a link to the System.Runtime.Remoting assembly, you need to run the following sequence of commands.
In the Solution Explorer window, call the “Add Reference…” command as shown in Figure 4. To do this, click the right mouse button on the element References.
Figure 4. The “Add Reference…” command
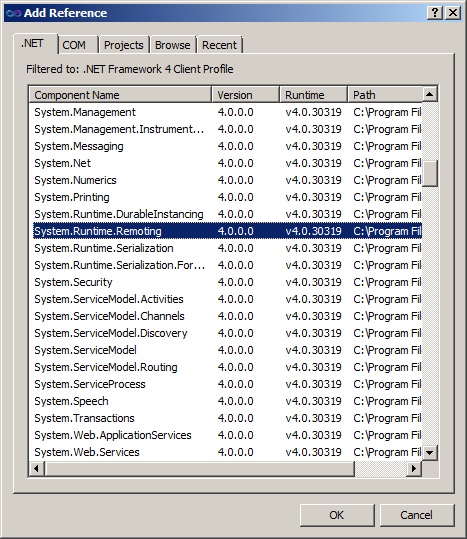
As a result, the Add Reference dialog box appears (Figure 5), in which you need to:
- activate the .NET tab;
- in the list of assemblies, select the System.Runtime.Remoting assembly;
- confirm selection using the OK button.
Figure 5. Connecting of assembly System.Runtime.Remoting.dll
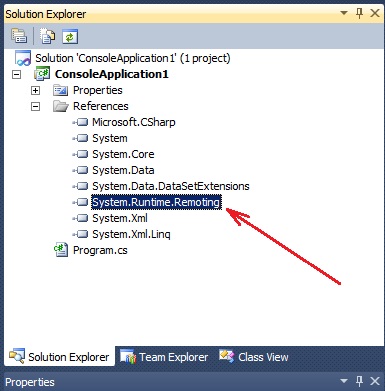
After that, the System.Runtime.Remoting assembly (Figure 6) will be displayed in the Solution Explorer in the ConsoleApplication1 project.
Figure 6. The System.Runtime.Remoting assembly connected to the project
⇑
3.2.2. Adding a reference to the assembly ClassLibrary1
Adding a reference to the ClassLibrary1 assembly is done by the same “Add Reference …” command, in the same way as connecting the System.Runtime.Remoting assembly (Figure 4).
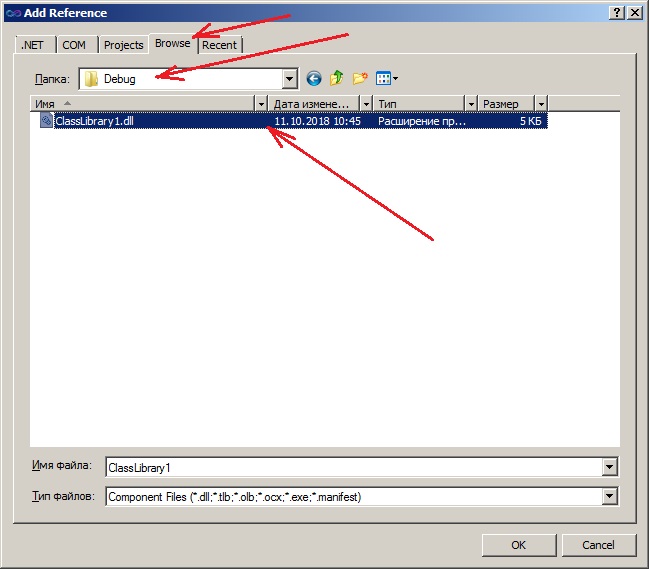
As a result, the Add Reference window will open, in which you need to activate the Browse tab as shown in Figure 7.
In the window, using the drop-down menu “Folder”, you need to select the folder in which the previously developed common assembly (see section 2) named ClassLibrary1 is located.
In this case, a folder is selected (see section 2.4.):
D:\Programs\ClassLibrary1\ClassLibrary1\bin\Debug\
Figure 7. Selecting a folder and file of common assembly
After selecting OK, the ClassLibrary1 assembly will appear in the Solution Explorer window in the References list of references to the used assemblies.
Figure 8. The ClassLibrary1 assembly in the list of assemblies of server application
⇑
3.2.3. Including of namespaces of the ClassLibrary1 and System.Runtime.Remoting assemblies in the program code of the Program.cs file
After connecting the assemblies to the project, you need to connect the necessary namespaces in the Program.cs file. Four namespaces are added:
using System.Runtime.Remoting;
using System.Runtime.Remoting.Channels;
using System.Runtime.Remoting.Channels.Http;
using ClassLibrary1;
Currently the text of the Program.cs file is as follows
using System;
using System.Collections.Generic;
using System.Linq;
using System.Text;

// adding namespaces
using System.Runtime.Remoting;
using System.Runtime.Remoting.Channels;
using System.Runtime.Remoting.Channels.Http;

using ClassLibrary1; // the library of common assembly

namespace ConsoleApplication1
{
    class Program
    {
        static void Main(string[] args)
        {
        }
    }
}
⇑
3.3. Writing server code
3.3.1. Steps to perform on the server
On the server computer you need to perform three basic actions:
- Create a communication channel. The HttpChannel class is well suited for this. There are other classes. A channel object of type HttpChannel is created;
- Register a channel with the static class ChannelServices. This class has a RegisterChannel() method. This method receives as a parameter the channel (type HttpChannel in our case) and the option of activating the security service (bool);
- Register the service as WKO-type (Well Known Object). This is done using the RemotingConfiguration class. In this class there is a static method RegisterWellKnownServiceType(), which performs the registration of the service.
⇑
3.3.2. Code text of the server-side
Below is the text for the software server-side code
using System;
using System.Collections.Generic;
using System.Linq;
using System.Text;

// adding namespaces
using System.Runtime.Remoting;
using System.Runtime.Remoting.Channels;
using System.Runtime.Remoting.Channels.Http;

using ClassLibrary1; // the library of common assembly

namespace ConsoleApplication1
{
    class Program
    {
        static void Main(string[] args)
        {
            // 1. Create a channel between the client and server, create an object of type HttpChannel
            HttpChannel ch = new HttpChannel(5000); // port number = 5000 - selected at random

            // 2. Register channel ch. The RegisterChannel() method indicates the security level is false.
            ChannelServices.RegisterChannel(ch, false);

            // 3. Register your service as a WKO
            RemotingConfiguration.RegisterWellKnownServiceType(
                typeof(ClassLibrary1.Class1),
                "MathFunctions.soap",
                WellKnownObjectMode.Singleton);

            // 4. Display messages that the service is running
            Console.WriteLine("MathFunctions service is ready...");

            // 5. Stop, leave the service in the running state, until the Enter key is pressed
            Console.ReadLine();
        }
    }
}
Let us explain some of the server-side code fragments.
First, a communication channel is created, which is represented by an ch object of type HttpChannel. The constructor of the class HttpChannel() receives the parameter of the port number through which communication between computers takes place. The port number can be a number from 0 to 65535. It is recommended to set the port number above 1024.
At the second stage, the ch channel is registered using the ChannelServices class. This is implemented by the class method RegisterChannel().The first parameter of the method is the ch channel, which needs to be registered. The value of the true flag requires the launch of a channel within IIS (Internet Information Server) to ensure security. Since our application runs outside of IIS, the value of the checkbox must be set to false.
At the third stage, you need to register the service as WKO-type (Well Known Object). This is implemented using the RemotingConfiguration class. In this class there is a RegisterWellKnownServiceType() method.
This method takes three parameters:
- data type, which is the type of our created class Class1 in the common assembly ClassLibrary1. In our case, you need to pass typeof (ClassLibrary1.Class1);
- a string that identifies our service on the server computer. In our case “MathFunctions.soap” is selected. Optionally, you can choose an another name;
- value from the WellKnownObjectMode.Singleton enumeration. This means that the server object is shared by all server clients.
At the end, the Console.Readline() method is called. This method is necessary to fix the execution of the console application, since the server part must be running all the time. At this time, customers will be able to contact it. Shut down the server – the Enter key.
⇑
3.4. Compilation. Server side files
At this step, you need to compile the text with the command
Build -> Build Solution
to get executable (*. exe) file. As a result, an executable file will be created with the name
D:\Programs\ConsoleApplication1\ConsoleApplication1\bin\Debug\ConsoleApplication1.exe
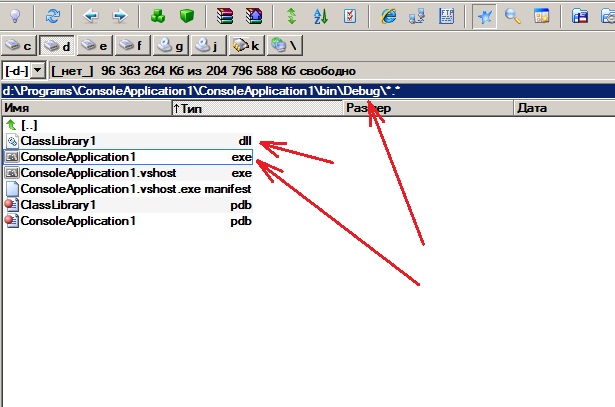
Figure 9 shows the contents of the Debug folder with the server-side project files. As can be seen from Figure 9, the common assembly file ClassLibrary1.dll is automatically loaded.
Figure 9. The contents of the Debug folder with the server-side ConsoleApplication1.exe executable and the build file ClassLibrary1.dll
Both ConsoleApplication1.exe and ClassLibrary1.dll files will need to be placed (copied) on the server computer.
After this, the project that corresponds to the server part is completed.
⇑
4. Client application development
In a network with several computers, there can be as many clients as you want, and the server is one. The server must respond to client requests. In our case, it is enough to develop a single application that makes requests to the server. Then the executable .exe file (module) of this application and the .dll file of the general assembly need to be copied (distributed) throughout the network to client computers.
⇑
4.1. Creating a client-side application using Windows Forms template
A Windows Forms project is created in the standard way:
File->New Project...
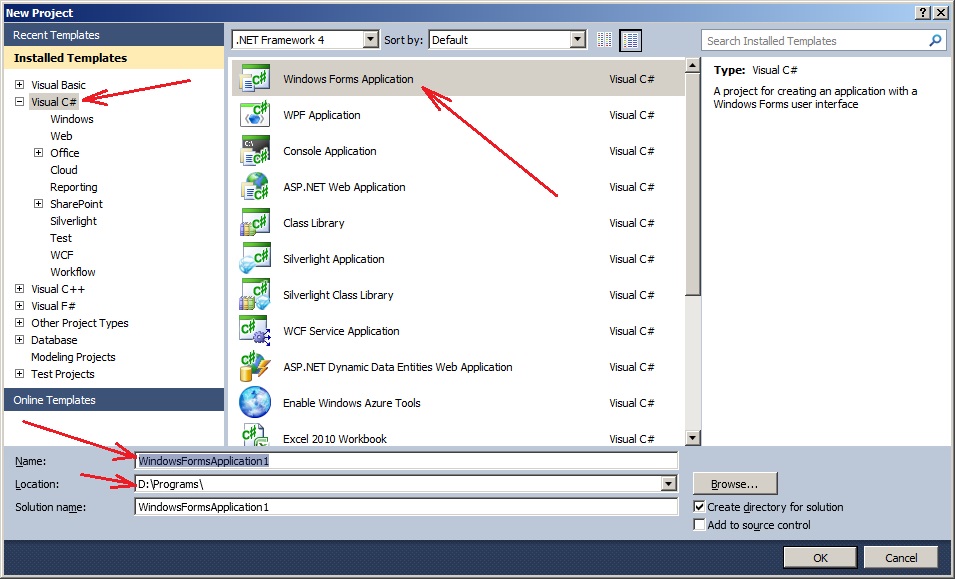
As a result, the New Project window opens. In the New Project window, select the tab
Visual C# -> Windows Forms Application
as shown in Figure 10.
Figure 10. The project is a type of Windows Forms Application, which will be hosted on the client computer
In the project are given:
- project name WindowsFormsApplication1;
- project folder D:\Programs.
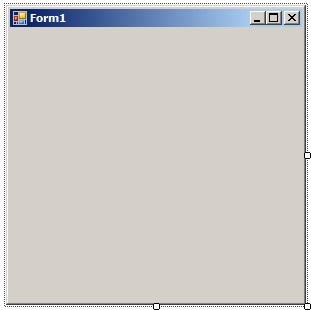
After selecting OK, a new project form will be created as shown in Figure 11.
Figure 11. New form of the project
⇑
4.2. Designing the form
4.2.1. Placing controls Label, Button, TextBox on the form
The following controls should be placed on the form (Figure 12):
- four controls of type Label. By default, objects are created with the names label1, label2, label3, label4;
- one control of type Button. By default, an object is created with the name button1.
Figure 12. Placing controls on the form
⇑
4.2.2. Setting properties of form and controls
A detailed description of how to set up controls on the form can be found in the topic:
In this step, using the Properties window, you need to configure the following properties of the form and controls:
- in Form1, property Text = “Quadratic equation solution”;
- in Form1, property StartPosition = CenterScreen;
- in Label1, property Text = “a = “;
- in Label2, property Text = “b = “;
- in Label3, property Text = “c = “;
- in Label4, property Text = “Result: “.
After setting the controls, the form window will look like the one shown in Figure 13.
Figure 13. Client program window after setting
After that, you can develop client code.
⇑
4.3. Module Form1.cs text
The main form of the client program corresponds to a module (file) named Form1.cs. Program code of Form1.cs file is as follows:
using System;
using System.Collections.Generic;
using System.ComponentModel;
using System.Data;
using System.Drawing;
using System.Linq;
using System.Text;
using System.Windows.Forms;

namespace WindowsFormsApplication1
{
    public partial class Form1 : Form
    {
        public Form1()
        {
            InitializeComponent();
        }
    }
}
⇑
4.4. Algorithm of the client program
On the client computer perform the following steps:
- create a channel to connect to the server. In our case, the class HttpChannel is used. Unlike the server, the client does not need a port number. Therefore, when creating a class, the constructor HttpChannel() without the port number will be called. For the server, the port number must be set, so that the client knows where to find it. And the client doesn’t need the port number, since the system itself will select the first suitable port to create the channel;
- register a channel in the system using the ChannelServices class, which has the corresponding RegisterChannel() method;
- create an instance (object) of type Class1. This class is implemented in the general assembly (see p.2). In this class there is a method for calculating the quadratic equation CalcEquation().To create an instance, use the class Activator. In the Activator class, there is a static GetObject() method that creates a proxy between the client and the server for the loaded WKO object. The GetObject() method returns an object of type Object, through which its remote methods can be called (in our case, the CalcEquation() method);
- call the CalcEquation() method from the created instance. Get the result of solving a quadratic equation and derive it on the form. This will all be done in the event handler for the click on the “Calculate” button.
⇑
4.5. Writing client code
4.5.1. Adding references to assemblies
In order to use the general assembly code on the client computer, you need to connect:
- program code for the common assembly ClassLibrary1.dll;
- program code of assembly System.Runtime.Remoting.dll.
This is done by the “Add Reference …” command in the same way as was done for the server part (see sections 3.2.1, 3.2.2).
Once connected, the References tab in the Solution Explorer window will look like Figure 14.
Figure 14. References tab in Solution Explorer. Connected assemblies ClassLibrary1 and System.Runtime.Remoting
⇑
4.5.2. Connecting namespaces
As in the case of the server part, in the Form1.cs file you need to include the namespaces of common assembly and System.Runtime.Remoting using the using directive.
...

// including of namespaces
using System.Runtime.Remoting;
using System.Runtime.Remoting.Channels;
using System.Runtime.Remoting.Channels.Http;
using ClassLibrary1; // common assembly

...
⇑
4.5.3. Writing the code for the Form1_Load () method
Creating a channel between the server and the client in the client part will be performed only once. After the channel is created, the CalcEquation() method from the server side can be called multiple times.
Considering the above, it is advisable to program the Load event of Form1. This event is raised at the beginning of the form creation. In our program, this event corresponds to the Form1_Load() handler. In the handler, you need to place the program code for creating a channel, registering a channel, and creating a remote object.
The following is the text of the Form1_Load() event handler:
private void Form1_Load(object sender, EventArgs e)
{
    // Performing actions on the client side
    // 1. Create a channel between client and server
    HttpChannel ch = new HttpChannel(); // the port number is not needed

    // 2. Register channel
    ChannelServices.RegisterChannel(ch, false);

    // 3. Create a remote access object to the server
    remote = (Class1)Activator.GetObject(
                 typeof(Class1),
                  "http://localhost:5000/MathFunctions.soap"); // localhost - the temporary name of our computer
}
⇑
4.5.4. Programming a click event on the “Calculate” button. Client text
At this step, you need to program the processing of the click event on the “Calculate” button (button1). A detailed description of how the event is programmed is described in the topic:
The text of the client program with the implemented event handler for clicking on the “Calculate” button is shown below.
using System;
using System.Collections.Generic;
using System.ComponentModel;
using System.Data;
using System.Drawing;
using System.Linq;
using System.Text;
using System.Windows.Forms;

// include the namespaces
using System.Runtime.Remoting;
using System.Runtime.Remoting.Channels;
using System.Runtime.Remoting.Channels.Http;
using ClassLibrary1; // common assembly

namespace WindowsFormsApplication1
{
    public partial class Form1 : Form
    {
        Class1 remote; // variable that represents remote access

        public Form1()
        {
            InitializeComponent();
        }

        private void button1_Click(object sender, EventArgs e)
        {
            // 4. Call the server-side CalcEquation () method to calculate the quadratic equation
            double a, b, c;
            double x1, x2;
            bool f;

            a = Double.Parse(textBox1.Text);
            b = Double.Parse(textBox2.Text);
            c = Double.Parse(textBox3.Text);

            // invoke the remote method
            f = remote.CalcEquation(a, b, c, out x1, out x2);

            // output of the result
            if (f)
                label4.Text = "Result: x1 = " + x1.ToString() + "; x2 = " + x2.ToString();
            else
                label4.Text = "The equation has no roots.";
        }

        private void Form1_Load(object sender, EventArgs e)
        {
            // Performing actions on the client side
            // 1. Create a channel between client and server
            HttpChannel ch = new HttpChannel(); // port number is not needed

            // 2. Register the channel
            ChannelServices.RegisterChannel(ch, false);

            // 3. Creating an object of remote access to server
            remote = (Class1)Activator.GetObject(
                       typeof(Class1),
                        "http://localhost:5000/MathFunctions.soap"); // localhost - the temporary name of our computer
        }
    }
}
In the above code, the general name of our computer is localhost. If there is a network, then on the client computer this name will need to be replaced with the network name of the server computer. The client project will need to be recompiled again.
⇑
5. Testing the interaction between the client and the server on the same computer without using a local network
Testing the interaction between the client and the server is carried out on the same computer, which in the system is called localhost. After successful testing, this name will be changed to the name of the server computer on the network.
For testing you need:
- run the server application (Figure 15) from the server folder (see p. 3);
- run the client application for execution (Figure 16) from the client folder (see p. 4);
- enter data into the client application and perform calculations.
Figure 15. Running the server side
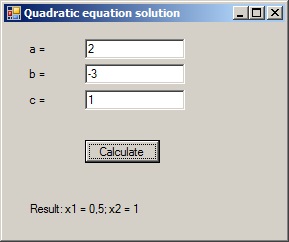
An approximate result of the client application is shown in Figure 16.
Figure 16. Client program
Important: if you close the server program and try to perform calculations on the client, an exception will arise. The system will not be able to find the server application. So, for testing, the server should be running all the time.
You can run as many clients as you want and make requests to the server.
⇑
6. Copying the server part to another computer
In this step, you need to copy the ConsoleApplication1.exe and ClassLibrary1.dll files to the server computer. This is done using, for example, a regular file manager. Files are copied to the folder prepared by deliberately.
⇑
7. Determining the name of the server on the network from the client computer
When computers are united in a local network, each of them has its own unique name. The method for determining the name of a computer on a network depends on the specific implementation of the operating system. In general, to determine this name, you need to call the Control Panel utility. In this utility, you can select the item System. A window will open in which you can read the name of the computer.
⇑
8. Correction of client code. Replacing the name localhost
If you know the name of the server computer in the local network, then you need to make changes in the client part. In the source code of the Form1.cs file in the Form_Load() method instead of the line
"http://localhost:5000/MathFunctions.soap"
must be entered
"http://MyComp:5000/MathFunctions.soap"
where MyComp – the name of server computer in the network. Most likely you will have a different name.
So, the text of the event handler of the form load event in our case is the following:
...

private void Form1_Load(object sender, EventArgs e)
{
    // Performing actions on the client side
    // 1. Create a channel between client and server
    HttpChannel ch = new HttpChannel(); // port number not needed

    // 2. Registration of channel
    ChannelServices.RegisterChannel(ch, false);

    // 3. Create a remote access object to the server
    remote = (Class1)Activator.GetObject(
               typeof(Class1),
                "http://MyComp:5000/MathFunctions.soap"); // MyComp - the name of server in network
}

...
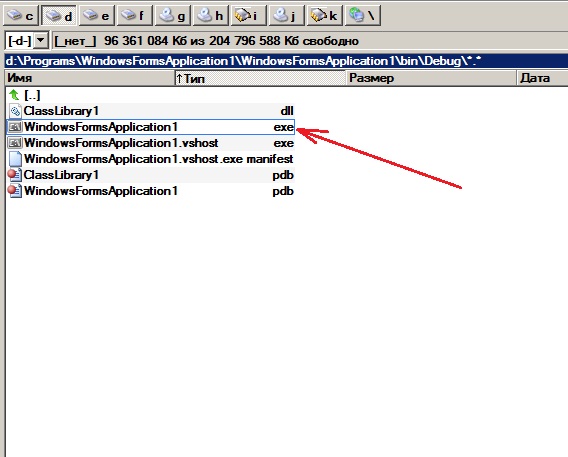
After that, you need to recompile the client project to form a new executable module. Figure 17 shows the WindowsFormsApplication1.exe file of the client module. This folder also has a shared assembly ClassLibrary1.dll.
Figure 17. Folder with WindowsFormsApplication1 client executable
⇑
9. Testing the interaction between the client and the server on different computers that are interconnected in a local network
At this stage, you need to test the work between the client and the server on different computers that are interconnected in a local network.
For this, you need:
- using the file manager, copy the ConsoleApplication1.exe and ClassLibrary1.dll files to a folder on the server computer;
- run ConsoleApplication1.exe on the server. The server must first have the .NET Framework 4.0 library installed;
- copy the WindowsFormsApplication1.exe files (client application) and ClassLibrary1.dll to the desired folder;
- run the WindowsFormsApplication1.exe file on the client side, enter the data, check the result of the function from the server.
It is important: to interact between the client and the server, the client computer must have appropriate access rights to the server computer. For example, the server may have shared access to its resources. This is all done by the appropriate settings on the server computer. In this topic it is not considered.
⇑
Related topics
⇑


