An example of creating the local MS SQL Server database in MS Visual Studio
In the theme are is shown a task solving of creating the MS SQL Server database using MS Visual Studio. The following questions are considered:
- working with Server Explorer in MS Visual Studio;
- creating a local database of SQL Server Database type;
- creating the tables in database;
- editing of the tables structure;
- linking of database tables between themselves;
- entering data to the tables using MS Visual Studio.
Contents
- The task
- Instructions
- 1. Run MS Visual Studio.
- 2. Activate the Server Explorer window.
- 3. Creating the database “Education”.
- 4. Objects of database Education.
- 5. Creating the table Student.
- 6. Creating the table Session.
- 7. Editing the structure of tables.
- 8. Making connections between the tables.
- 9. Entering data into the tables.
- Related topics
Search other websites:
The task
Using MS Visual Studio create a MS SQL Sever database named “Education”. Database includes two tables Student and Session. Tables are linked by some field.
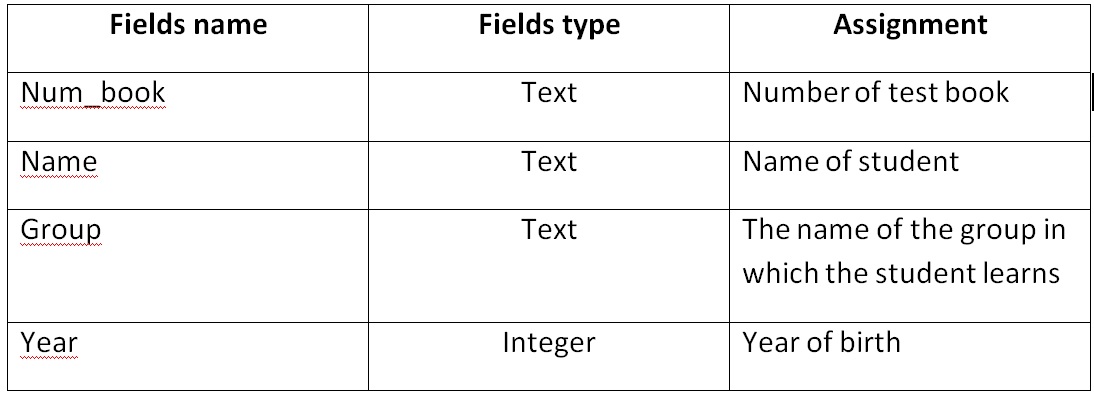
Structure of “Student” table.
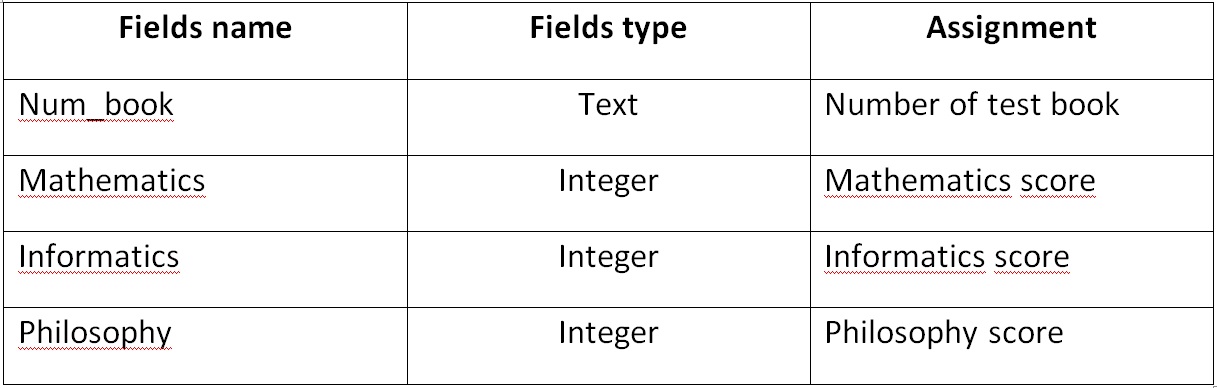
Structure of “Session” table.
⇑
Instructions
1. Run MS Visual Studio.
2. Activate the Server Explorer window.
To work with databases Microsoft provides the lite database server Microsoft SQL Server. There are different versions MS SQL Server, for example: Microsoft SQL Server 2005, Microsoft SQL Server 2008, Microsoft SQL Server 2014 and others.
You can load these versions from the site Microsoft www.msdn.com.
This server is excellent for working with databases. It is free and has a graphical interface for creating and managing databases using SQL Server Management Tool.
First of all, before creating a database, you need to activate the utility “Server Explorer”. To do this in MS Visual Studio you need to call (figure 1)
View -> Server Explorer
 Figure 1. Calling the Server Explorer
After calling, the “Server Explorer” window will have the approximate view as shown in Figure 2.
 Figure 2. Window “Server Explorer”
⇑
3. Creating the database “Education”.
To create a new database, that is based on the provider Microsoft SQL Server, you need to click on the “Data Connections” node. Then you need to select “Create New SQL Server Database …” (Figure 3).
 Figure 3. Calling the command of creating of database SQL Server
As a result, the window “Create New SQL Server Database” will be opened (Figure 4).
In the window (in the «Server Name» field) is indicated the local name server installed on your computer. In our case this name is “SQLEXPRESS”.
In the field “New database name:” you need to specify the name of database, which will be created. In our case this name is “Education”.
“Use Windows Authentication” option must be left unchanged.
 Figure 4. Creating a new database MS SQL Server
After completing the steps, the “Server Explorer” window will be as shown in Figure 5. As see in Figure 5, in the list of databases, is added the database “Education” which is named as:
sasha-pc\sqlexpress.Education.dbo
 Figure 5. The “Server Explorer” window after adding the database Education
⇑
4. Objects of database Education.
If you expand the Education database (“+” sign), you can see a list of the following major objects:
- Database Diagrams – they show relationships between tables of database;
- Tables – tables, where data is stored;
- Views. The difference between the views and tables is that the database tables contain data but views data does not contain and views can be chosen as the content of the other tables or views;
- Stored procedures. They represent a group of related operators in the SQL language, which provides additional flexibility when working with the database.
⇑
5. Creating the table Student.
At present, database “Education” is empty and doesn’t contain any objects (tables, stored procedures, views and so on.).
To create a table, you need to call the context menu (click of right button mouse) and select the command “Add New Table” (Figure 6).
 Figure 6. Command of adding a new table
There is and other case of adding a table to database by using a commands of menu “Data”:
Data -> Add New -> Table
 Figure 7. Alternative adding a new table.
As a result, the window of adding a new table will be opened. This window contains three columns (Figure 8). In the first column “Column Name” you need to enter the title of corresponding field of database table. In the second column “Data Type” you need to enter the data type of this field. Third column “Allow Nulls” indicates the option of the possibility of a lack of data in the field.
 Figure 8. The window of creating a new table
By using the table editor you need to form the table Student as shown in Figure 9. The table name must be set when it is closing.
In the editor table you can set the properties of fields in the “Column Properties” window. To set length of string (nvchar) in the symbols, in the window Column Properties need to use property Length. By default the value of this property is 10.
 Figure 9. Table Student
Next step you need set the key field. It is realized by calling command “Set Primary Key” from the context menu of field Num_book. By using the key field will be set the relationships between tables. In our case the key field is the number of test book.
 Figure 10. Specifying the key field
After setting the primary key the window of table will have the following view (Figure 11).
 Figure 11. Table Student after final formation
Now you can close the table. In the window of saving the table you need set the it’s name – Student (Figure 12).
 Figure 12. Entering the name of the table Student
⇑
6. Creating the table Session.
Following the model of creating a table Student is created table Session. At the Figure 13 the view of table Session is shown after final formation. Primary key is set in field Num_book. The name of table is set as “Session”.

Figure 13. Table Session
After performing steps, in the “Server Explorer” window will shown two tables Student and Session.
Thus, in the database you can add any number of tables.
⇑
7. Editing the structure of tables.
There are cases when you need to change the structure of the database table.
First of all, to do change the tables of database in MS Visual Studio, you need remove the option “Prevent Saving changes that require table re-creation” as shown in Figure 14. Otherwise, MS Visual Studio will block entering the changes to previosly-created table. The window “Options” (Figure 14) is called from menu Tools in the following sequence:
Tools -> Options -> Database Tools -> Table and Database Designers
 Figure 14. The option “Prevent Saving changes that require table re-creation”
After settings you can change the structure of tables. To do this you can use command “Open Table Definition” (Figure 15) from the context menu, that is called for selected table.
 Figure 15. Calling the command “Open Table Definition“
Also this command is realized in the “Data” menu:
Data -> Open Table Definition
Previously you need select the table.
⇑
8. Making connections between the tables.
According to problem condition there are connections between tables by field Num_book. To create link between tables, first of all you need (Figure 16):
- select object Database Diagram;
- select command Add New Diagram from the context menu (or menu Data).
 Figure 16. Calling the command of adding a new diagram
As a result, the window of adding new diagram “Add Table” (Figure 17). In this window you need to select two tables “Student” and “Session” and press the “Add” button.
 Figure 17. The window of adding the table to diagram
 Figure 18. Tables Student and Session after adding they to diagram
To set the relationship between tables, you need click on the field “Num_book” of table Student and then (holding down the mouse button) drag it to the field “Num_book” of table Session.
As a result, will be opened two windows: “Tables and Columns” (Figure 19) and “Foreign Key Relationship” (Figure 20). In these tables you need leave all as it is and confirm your selection by clicking at “OK” button.
In the window “Tables and Columns” is set the title of relation (FK_Session_Student) and name of parent table and child table.
 Figure 19. Window “Tables and Columns”
 Figure 20. Window of setting the properties of relation
After that the relationship between tables (Figure 21) will be set.
 Figure 21. Relation between tables Student and Session
Saving the diagram is in the same way as saving the table. You need choose the diagram’s name at your discretion (for example “Diagram1”).
At the next step, the window “Save” will be opened. In this window you need to confirm your choice (Figure 22).
 Figure 22. Confirming of saving the changes in tables
⇑
9. Entering data into the tables.
Microsoft Visual Studio allows you to enter data into the tables directly.
In our case, when you set the relation (Figure 19), the table “Student” is realized as primary table (“Primary Key Table”). Therefore, first of all you need enter data in cells for the table “Student”. If you, first of all, will try enter data into the table Session, the system will block entering and will shows the corresponding message.
To access the data entry mode in the Student table, you need to call the command Show Table Data from the context menu (click by right mouse button) or from Data menu (Figure 23).
 Figure 23. Command “Show Table Data”
The window, where need to type data, will be opened (Figure 24).
 Figure 24. Entering data to the “Student” table
After entering data in the Student table you need to enter data in the Session table.
When you entering data to the field Num_book of Session table you need to enter exactly the same values, which entered in the field Num_book of table Student (because these fields are linked themselves).
For example, if in the field Num_book in the table Student enter values “101”, “102”, “103” (see Figure 24), then you need enter exactly these values in the field Num_book in the table Session. If you try enter other value then system will display approximate the following window (Figure 25).

Figure 25. A message about error of entering data in tables Student and Session
Table Session with entered data is shown in Figure 26.

Figure 26. Table Session with the entered data
So, database created. Inputting and processing of data in the tables can be implemented by using a programming.
⇑
Related topics
- 001 – An example of creating/connecting local Microsoft SQL Server database located in the “*.mdf” file
- 002 – An example of creating a table in the local Microsoft SQL Server database located in the “*.mdf” file
- 003 – Creating an autoincrement field (counter) in the MS SQL Server database table, which is located in the “*.mdf” file
- 004 – Creating a “one-to-many” relationship between tables in Microsoft SQL Server database
- 005 – An example of creating the “*.mdf” file of local database Microsoft SQL Server in MS Visual Studio
- 006 – The “Connection String” string of connection with database. An example of using in applications