Creating a database in Microsoft Access 2016. Creating a table with calculation field
Contents
- Task
- Instructions
- 1. Run Microsoft Access 2016. Create database. Command “New”
- 2. Creating a table in the table mode. Initial state
- 3. Developing the table. Creating table fields
- 4. Entering values into the table
- 5. Saving a table with data
- 6. Entering data into a table
Search other websites:
Task
1. Create a database and save it to disk.
2. Create a Product table. The structure of the Product table is as follows
|
Field number |
Field name | Field type |
Explatation |
|
1 |
ID_Product |
Integer, counter |
The unique identifier of the field, the primary key |
| 2 | Code | Integer | Product code |
| 3 | Name | Text | Product name |
| 4 | Count | Integer | The number of goods sold |
| 5 | Cost | The number of fixed-point, 2 decimal places | Cost of goods |
3. In the Product table, create the calculated field Sum_Cost, which is defined as the product of the quantity of goods sold and the value of the goods. The formula for calculating the calculated field Sum_Cost:
Sum_Cost = [Count] * [Cost]
here
- [Count] – the value of field Count of Product table;
- [Cost] – the value of field Cost of Product table.
⇑
Instructions
1. Run Microsoft Access 2016. Create database. Command “New”
After you start Microsoft Access, the system automatically proposes create a database, as shown in Figure 1.

Figure 1. Command to create a new database
In the window of database creation (see Figure 1) is proposed:
- select a database from the available templates. Microsoft Access DBMS offers a large set of sample database templates that can be used and studied. If you create a new database that does not contain any tables yet, then you need to select the “New database” element;
- specify the name of the database file. The default is the name of the Database1 file, which can be changed at its own discretion (Figure 2);
- specify the folder (directory) in which the database will be stored. The default folder is “C:\Users\user\Documents”.
To confirm the creation of a new database, select the button “Create” as shown in Figure 2.

Figure 2. Specifying the filename and folder
After creating the database, the file Database1.accdb will be created in the folder “C:\Users\user\ Documents”.
⇑
2. Creating a table in the table mode. Initial state
After creating the database file, the system goes to the table design window in the table mode. Microsoft Access DBMS supports 2 table creation modes:
- table mode. In this mode, the fields are displayed from left to right. The table is displayed in the normal form;
- constructor mode. In this case, each field of the table corresponds to one row, which is adjusted accordingly.
The default is table mode. In this mode it is proposed to create the first table. Figure 3 shows the initial state of the table mode.
The left side of the Microsoft Access window displays the table name “Table1”. This name can be changed later when the table is saved.
On the right side of the Microsoft Access window, an empty input box is displayed. In this field you can enter the names of the fields in the table. In our case, here you need to enter five fields (Code, Name, Count, Cost, Sum_Cost).

Figure 3. Creating a table in table mode
As can be seen from Figure 3, a field with the name “ID” is automatically created. This field will contain unique numeric values designed to prevent accidental data repeatability, there is unacceptable in any database. For our table, this field corresponds to the ID_Product field.
⇑
3. Developing the table. Creating table fields
In table mode, you can add and delete table fields and also enter data values (records) of the table. Below is a detailed step-by-step instruction on the formation of table fields. 6 fields are formed: ID_Product, Code, Name, Count, Cost, Sum_Cost. The Sum_Cost field is calculated, it is obtained as the product of the Count and Cost fields.
⇑
3.1. Forming the ID_Product field
In our case, the ID_Product field corresponds to the “ID” field in Figure 3. Therefore, it is enough just to rename the “ID” field to the ID_Product field.
To rename, you must perform the following steps:
1. Call the context menu (right-click on the name of the ID field) as shown in Figure 4

Figure 4. Context menu for the ID field
2. In the context menu, select the command “Rename field”. After that, you can change the name of the field.
3. In the field name enter the name ID_Product (Figure 5). Fix the name (the key Enter).

Figure 5. New name of the ID_Product field
⇑
3.2. Adding the Code field
The Code field has an integer type. To add the Code field, you must perform the following steps (Figure 6):
1. Call the command “Click to add”.
2. In the descending menu, select “Number”, because the field type is numeric.

Figure 6. Adding a new field to the table
As a result, a new field with the default name “Field1” will be added, as shown in Figure 7.

Figure 7. Adding a new field. The default field with the name “Field1”
3. Replace the name of the field “Field1” with the name of the Code (Figure 8). Fix the name (the Enter key).

Figure 8. Setting the name of the Code field
⇑
3.3. Adding a Name field. Adding a text field
3.3.1. The command to add a text field
The field Name of the table has a text type. To add a text field, you need to run one of two commands:
- right-click on the element “Click to add” (Figure 9) and select the command “Text” in the context menu;
- in the “Fields” menu, select the “AB Short Text” button (Figure 9).

Figure 9. Microsoft Access. Ways to add a text field in table mode
⇑
3.3.2. Features of field named Name. SQL reserved words
According to sample 3.2, you need to create the name of the Name field. The name Name in MS Access is reserved, therefore it is perceived by the system in a special way. When trying to establish the name Name, the system displays a warning window, as shown in Figure 10.

Figure 10. Warning window that Name is reserved by system
In the SQL database language, the names of fields or other items that match the reserved names are enclosed in square brackets, for example [Name].
In this case, select OK – no problem. As a result, the table will look as shown in Figure 11.
![Microsoft Access table add field [Name]](https://www.bestprog.net/wp-content/uploads/2019/02/09_04_02_001_11e.jpg "Microsoft Access. The mode of creating the table. Added field [Name]")
Figure 11. The mode of creating the table. Added field [Name]
⇑
3.4. Adding a Count field
The Count field is integer and is added just like the Code field. Details about adding Code field described in Sec. 3.2. Figure 12 shows the table after adding the Count field.

Figure 12. Table after adding the Count field
⇑
3.5. Adding a field Cost. Adding fixed-point fields
To form the Cost field with a fixed comma with an accuracy of 2 decimal places, you need to perform the following steps.
1. Click on the “Click to Add” field and select “Currency” in the context menu or select this command in the “Fields” menu (Figure 13).

Figure 13. Adding a fixed-point field
2. Instead of the name “Field1” enter the name of the field Cost. Fix the name (the Enter key). As a result, the database window will look as shown in Figure 14.

Figure 14. Table after adding and setting the name of the Cost field
3. With the Cost field highlighted (1), set the format to “Fixed” (2), as shown in Figure 15. Thus, the Cost field has the data type “Currency” and the “Fixed” format.

Figure 15. Setting the “Fixed” format for the Cost field
After the actions are performed, the table will look as shown in Figure 16.

Figure 16. Table view after adding main fields
⇑
3.6. Adding the “Sum_Cost” calculation field
To add the “Sum_Cost” calculation field, follow these steps:
1. Click on the field with the name “Click to add” (Figure 17).
2. In the context menu, select the sequence “Calculated field” => “Currency” (Figure 17). As a result, the “Expression Builder” window will appear, as shown in Figure 18.

Figure 17. Selecting the type of the calculated field Sum_Cost

Figure 18. Window “Expression Builder” to create formulas
3. In the “Expression Builder” window in the editor you need to enter the formula:
[Count]*[Cost]
as shown in Figure 19.
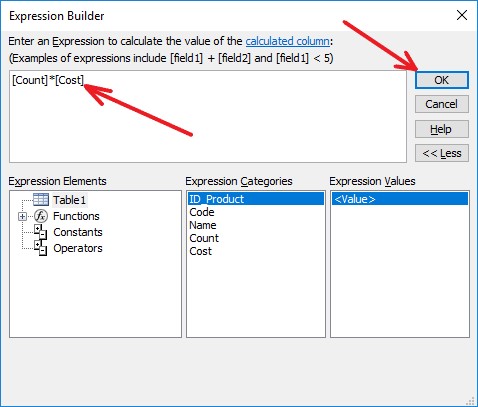
Figure 19. Window “Expression Builder”
After entering the formula, you need to confirm the command by clicking on OK. As a result, the “Expression Builder” window will be closed.
4. At this step, you need to change the name “Field1” to “Sum_Cost”, as shown in Figure 20. Commit changes (the Enter key).

Figure 20. Formation of the field name Sum_Cost
This concludes the creation of table fields. The next step is to enter the values in the table.
⇑
4. Entering values into the table
Input values into the table is performed naturally. Corresponding data is entered opposite of each field. It is important that the type of data that is entered matches the type of the field. Each line of the entered data is called a record. A table can have an arbitrary number of records (rows).
It should be noted that it is impossible to enter a value in the ID_Product field, since this field is a counter. These values are generated by the Microsoft Access DBMS automatically. When adding a new record ID_Product field value is increased by 1. When deleting a record, the number of this field remains forever reserved, the reduction of the ID_Product value by 1 does not occur.

Figure 21. Entering data into a table
⇑
5. Saving a table with data
After entering the data, you need to save the table. By default, the table is named “Table1”. To call the window for saving a table, you need to do one of two things:
- execute the “Save” command from the “File” menu;
- select the ‘x’ symbol to close the table window (Figure 22) and then answer “Yes” to the save request;
- select the floppy button to keep the table as shown in Figure 22.

Figure 22. The command to save the table or close the table
As a result, the Save window will open, prompting you to specify the name of the table. The default name is “Table1”. In our case, you need to specify the name Product as shown in Figure 23.

Figure 23. Specify the name of table Product
After confirming with OK, the table will be added to the database. Figure 24 shows the Microsoft Access window with the Product table open.

Figure 24. Microsoft Access 2016 window. The ‘Product’ table
As can be seen from the figure, the name of the table has changed.
⇑
6. Entering data into a table
Now you can enter data into the table. When you close the table, the data will be saved automatically. Figure 25 shows the Product table with the data entered.

Figure 25. The table ‘Product’ with entered data
Task is solved.